Cross-dressing for Dancing

I mentioned in my post about Celebration de Medici that I was surprised I hadn’t written about making that outfit… it turns out I did! I just never posted it. So here’s the post, originally written in 2020 about a project from 2018. Wibbly wobbly timey wimey stuff, I know. I’ve added commentary from 2024 in italics.

Introduction

Yet another project from 2018! This is the last one, finally.

The Academie Atlantienne de la Danse (of which I am Chatelaine) held a dance competition at the Kingdom Arts & Sciences Festival in February 2018. My canton decided to enter two versions of the dance Leoncello.  (You can watch our performance here. Ragna and I also danced an encore which you can see here.)

[I stepped down from the position of Chatelaine for the Academie when I stepped up as Minister of Arts & Sciences for my local group.]

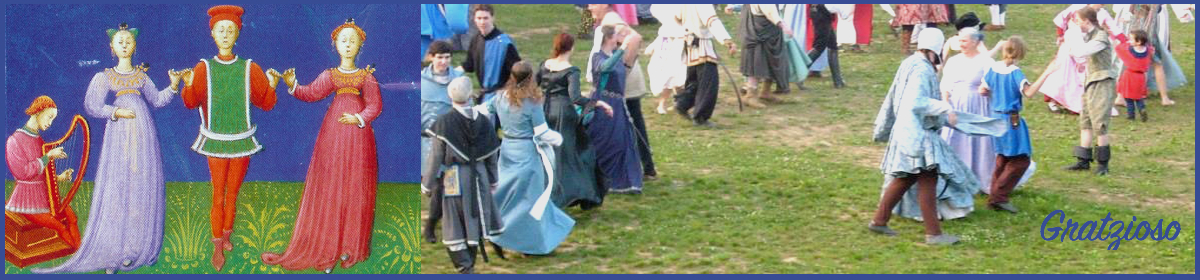
I had been doing a lot of work on the evolution of 15th century Italian dance and wanted to showcase that. We picked Leoncello because it was the first dance I had traced like that as well as the fact that we had performed it a couple of years prior so we already had good familiarity with it. Leoncello was also one of the most popular dances of the 15th century. We can document it being danced for nearly a hundred years. We danced the original version by Domenico in 1455 and then the latest recorded version from 1517.

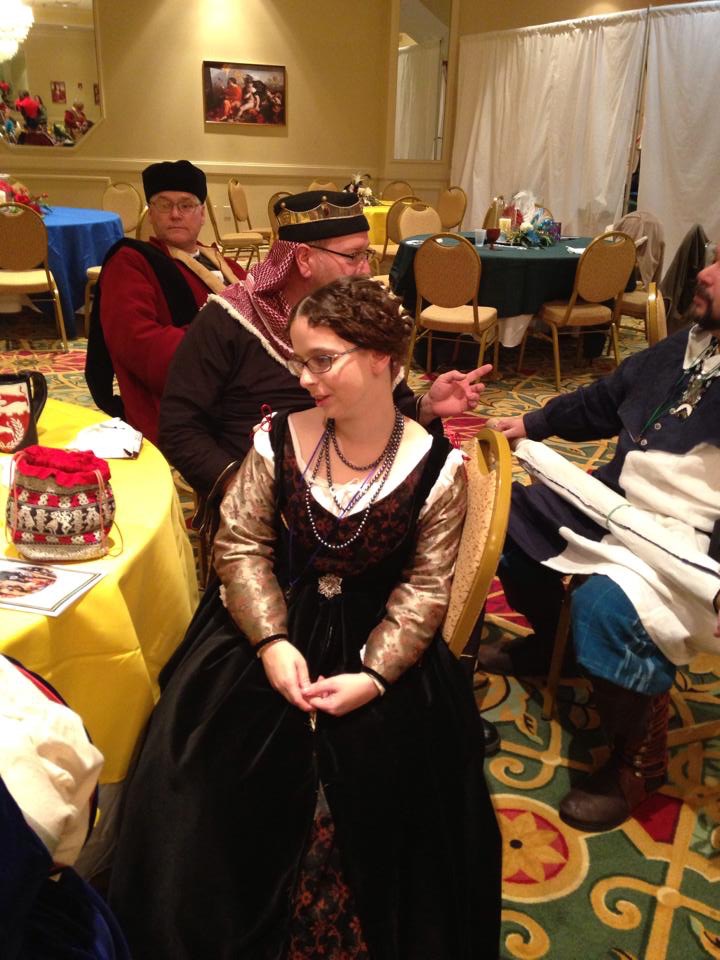
We decided as part of our performance to also include the clothing. We wanted to have group members to represent the evolution of clothing that happened over the course of the evolution of the dance. Several of the group members already had appropriate clothing for the end of the era, around 1500 to 1520. No one had outfits appropriate for when the dance was originally written around 1455. (Although the manuscript it is from was written in 1455 we believe Domenico created the dance some years prior to that.) So Ragna and I ended up dancing together and determining to be the couple in the earlier clothing, which meant that we needed to make pellandi. (Houppelande is the French term for this garment that was popular all over Europe in the 15th century. Italy seems to have abandoned it a lot sooner than Northern Europe as well.)

I decided to cross-dress and make a male outfit for the competition because, well, look at those guys: don’t you want to feel that fabulous too?

Inspiration images from Sienese frescoes – https://www.wga.hu/html_m/d/domenico/bartolo/pellegri/ – scroll down to “Feeding of the Poor (detail)” and look at the gentleman in blue.

The Layers

I cheated rather a lot on the bottom layer. I wore modern leggings because I didn’t have time to make hose. The men’s version of the camisa also generally had a different neckline than the women’s, but I already had this one so I wore it. The boots are the same modern ones that look vaguely appropriate that I wear with a lot of my garb.

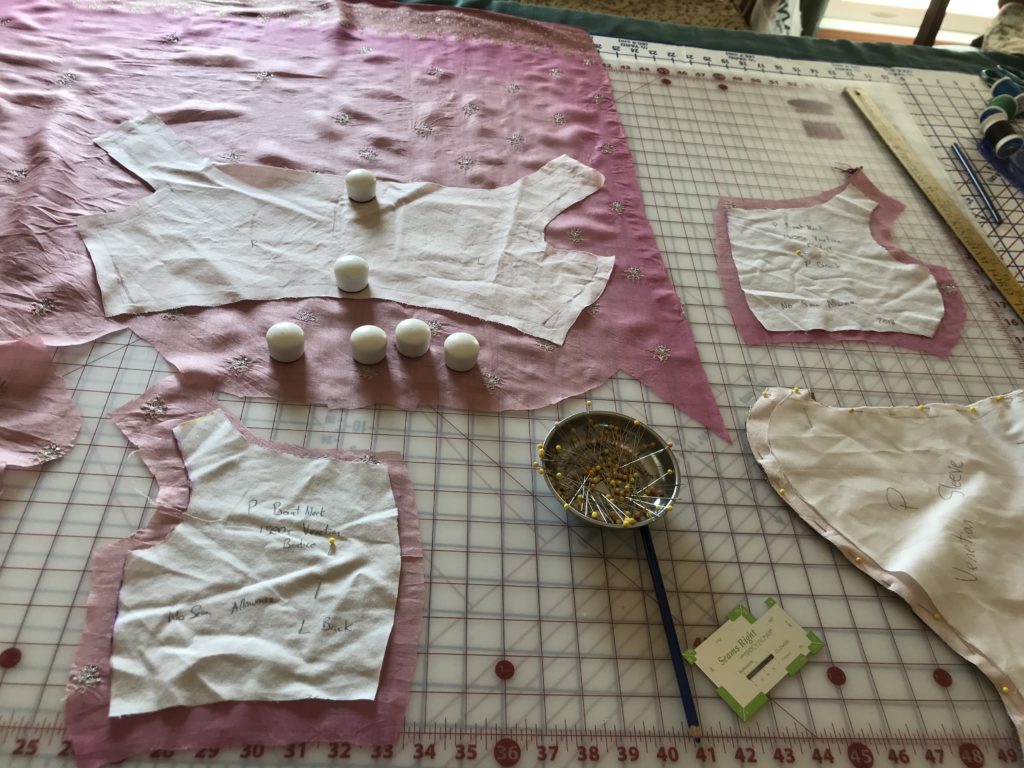
The second layer is the farsetto or doublet. I forgot to take any in-progress photos. The fabric is just a linen I got from fabric-store. In order to pattern this we started from one of my gamurra bodice and sleeve patterns. (There were multiple guilds of tailors for different thins in Venice in the 15th century, however, the same tailors for mens doublets made womens gowns. Seemed a reasonable starting point.) We drafted the skirting panels based on a few images. For the sleeves I added width to the top half of my existing sleeve pattern and then gathered that into the regular bottom half. I am not certain how it would actually have fastened in this timeframe but hooks and eyes existed and seem logical. [I actually never got the hooks and eyes sewn on and it was pinned in place on the day of.]

The final layer is the pellando. I had the green/gold brocade in my stash. I think I was originally planning to make a giornea out of it, but I’m not sure it would have been enough fabric. I patterned this based on Cynthia Virtue’s houppelande patterning ideas. Some of the pellandi in the images from this timeframe appear to use a different construction method, with a yoke at the shoulders and then pleats below. The pleats were probably set in place with a tape behind them. If I ever make another I would like to try this method.

Ragna and I developed the sleeve pattern based on the images and some basic measurements of my arm, along with a lot of guess work. We were very pleased after we had already cut and started work on the sleeves to find other people’s patterns for this style of sleeve that matched ours, as well as images that showed the seam placement in the same place as what we had done. I did a lot of hand-finishing work on the sleeves. They are the only part of this that is fully-lined as we did not have enough of the brown velvet to line the whole garment.

Reflections

I liked how this turned out. We looked good together and everything really came together how I wanted it to with the pellando. Also, do you know how much stuff you can fit in those sleeves? I walked around with a water bottle in one sleeve and a sandwich in the other for a large chunk of the day. (Not a little sandwich, a hoagie.) I don’t know how much difference it really made to my dancing, although I felt bouncier than when wearing long skirts.

I wish I had had time to make a fabulous hat like the gentlemen in the frescoes. The hat I used worked but isn’t nearly as amazing. I think that’s my main regret about the outfit. [I substituted a green flat cap this time and it worked better than the other one I had in 2018 but I still want a fabulous hat for this outfit.]

2024 Reflections

I LOVED wearing this outfit again to teach dance at Celebration de Medici. The sleeves are fun, it still has full skirts for maximum swoosh but also you can see my legs as I explain how to do complicated steps! I may have mildly sprained my ankle jumping around like a fool because it really does inspire that kind of behavior.

I’m planning to make some mild modifications to the farsetto and make an actual appropriate under-shirt this year. I would also like to make a masculine giornea for warmer weather. That pellando is WARM. Overall, I think there’s a lot more masculine 15th century garb in my future.

2023 (and 2022…2021…2020) Wrap Up

Yes! I’m alive!

Last time I posted here was to review 2019 and plan for 2020. We all know how that went! Today’s post is a catch up on my arts & sciences projects since then. I’m going to organize by type not date.

Dance

I haven’t done much new dance research or reconstruction.

I did run a virtual dance practice monthly throughout 2020, which was a good way to get some social time in. In summer 2021 we held summer outdoor practices for a few months. Since then I’ve been trying to maintain a monthly practice in the face of changing meeting spaces and changing jobs (twice!). It’s a struggle.

I also co-ran a ball at Pennsic 50–Camp Flamingo Bluff sponsored a ball and I taught the first set. That was fun and nerve wracking. The Pennsic Dance tent is a A LOT of people to call and teach to, especially the first set of a well attended ball.

The team that led flamingo ball and our Sam.

I really need to fix and update the dance reference part of this website. Other than that, my dance related goal for 2024 is to take all my scattered notes on the 1517 German Letter dances and organize them and actually write something up from them. I will probably revisit and recheck my reconstruction at that point too.

Food

I’ve done a lot of cooking! When lockdown hit we were a few weeks out from Defending the Gate with a menu for feast that I had designed mostly on my own, themed around the battle of Pavia in 1525. The event was cancelled but the menu lived on. We went back to the research, refined it and ended up cooking it for Defending the Gate in 2022. You can cook the recipes – we posted them here.

In 2020 I also ran a virtual class on how to create your own sourdough starter (Starting Out, First Week, Maintenance). I’ve been doing sourdough baking since 2015 and had started my own culture, Mr Sticky, in 2018, so when everybody wanted to learn to bake with sourdough I figured I could help.

In 2021, we held a virtual Defending the Gate event to be able to invest our new baronage. Jasper and I designed a Virtual Potluck Feast for that event – something that people could cook at home and share a feast on Zoom. Jasper did a lot of the recipe write up on that one and I helped with finding historical references and sources. I still think it’s one of our cooler pandemic era ideas. You can still cook it here.

In 2023, Jasper and I co-planned the Defending the Gate feast themed around the siege of Otranto in 1480. This had an Ottoman cuisine inspired course and a southern Italian cuisine inspired course. I still don’t have the recipes written up and posted- so that’s one of my goals for 2024. We also ran the bagged lunch for Royal Archer which was mostly simple fare but I want to play with the dehydrator and jerky recipe more. (Drying my own herbs! It’s hard to do otherwise, the air is too dang humid here.)

This year we are running the Defending the Gate feast again, and the event is themed around the retaking of Otranto. So obviously I’ll be working on that menu as a major goal for 2024. Since the city was retaken by Spanish and Hungarian forces we have a lot of options to play with for dishes. It’s almost too hard to narrow them down.

I also have plans for a display at Kingdom A&S around the history of flour milling in northern Europe that I’m setting up with a friend. We got sucked into a research rabbit hole on millstones at Pennsic that has proven to be pretty fascinating. Certain stone was prized enough as millstones to be quarried from the same location for nearly a millennium and shipped all over Europe. More details on that forthcoming in March!

Eventually this project is going to turn into a larger display on bread in northern Europe, I think. We’ll see. I’ve found a lot of the information I need but I’m still stuck on a few pieces.

Clothing

My main sewing has been Roman lately. I’ve got a couple of reasons for this. One is that I decided that it would be cool and comfy for hot summer events in the southeastern US. Another is that I figure with Venice’s obsession with Rome, if my persona cosplayed anything herself, it would be a Roman matron. The last is that it’s forgiving of body changes.

I don’t have big sewing goals for 2024. I would like to finish my masculine 1450s Italian outfit so I can wear that for some dance events. (I am just realizing I never posted a dress diary for that one. Oops!) My summer Roman collection is pretty complete. I will probably be trying on a lot of my 15th century Italian and seeing what can be made to work with my current shape and size. It would be nice to finish the fancy heraldic Norse outfit I started embroidering ages ago, but I’m currently stuck on how to do one part. We’ll see.

Crafting (non period)

I’ve done a bunch of knitting and embroidery the last few years. None of it is really SCA period relevant though. I don’t really like early knitting, especially as it’s generally colorwork in the round on tiny needles. I have a lot of hand pain from the combination of small needles and narrow diameter circles. Still, knitting is a favorite anxiety reducing craft for me…

I have also rediscovered my enjoyment of embroidery lately. I haven’t really focused on period techniques, just been doing projects that amuse me and some presents/commissions.

Digital Art

I bought a new iPad and got the Apple Pencil and that has led to me rediscovering my enjoyment of digital art. I used to do a lot of it in college and then pretty much haven’t done any in the past decade.

2020 Plans

A look ahead…

Sewing

I plan to keep working on my over-the-top appliqueed and embroidered Norse smokkr. At some point, I’d like to work out a new serk (underdress) pattern and start the green serk for the same outfit. I already have the coat patterned, so I will hopefully get to start on that this year as well. Other than that outfit, my main sewing plan for this year is a lot of fixing and finishing. I have several mostly-finished projects that need a few details. I’m not currently planning to attend any major events this year that I have to have new garb for, so I’d like to get what I have in better order.

Dance

I finished arranging the music for Il Ballo D’Eleanor and we premiered it at the Red Mountain Mead Hall event in Isenfir. I will be teaching it at our Kingdom University in February and we will be sending a video for the Dance Showcase and Kingdom A&S in March. I will be posting the directions, music and more information on the dance in the next couple of months leading up to those events.

I want to really focus on getting the dance pages on this site in order. There are a lot of dances I have reconstructed and don’t have up. I also want to sit down and actually write up all my specific research on the dances in the Nuremburg Letter – currently it is in notes in lots of different places.

Food

Over the years I’ve been sucked more and more into helping my husband and his buddies with planning the feast they cook for our local March event. This year, Jasper and I ended up pretty much planning the menu after I suggested the theme. It all started with the thought process “Italian food before tomatoes”. We test cooked it recently and I’m pretty excited about the food.  It’s all themed around the Battle of Pavia (1525) between the forces of Charles V of Spain/HRE and King Francis I of France over control of Lombardy. I’ll be baking bread for it, of course.

Blog

I managed to post more last year, at least until about July. This year I’d like to keep building on that and post at least once a month without giving up when the new school year starts in August.

2019 Sewing Reflections

Spent all of 2019 trying to catch up on the million things I sewed in 2018… (At least still 2 more 2018 dress diary posts I need to get up but I don’t have all the pictures I need for them yet.) What about what I sewed in 2019?

I didn’t sew nearly as many things in 2019. No wedding, no Pennsic, no dance competition that I randomly decided I needed a new outfit for… I also took on a couple of major projects that take a while.

In the beginning of 2019 I was helping plan the menu for the feast for Defending the Gate in March. I spent a bunch of time helping Jasper with recipe testing, as well as baking. I baked all the rye bread for one of the removes of that feast. I did also start a sewing project I was hoping to have ready for the event – a new smokkr in the style of the köstrup find. I almost had it sewn in time to wear to the event, except that I was so worn out from baking that I couldn’t make the pleats work and gave up.

I did come back to that project in the fall. I was able to figure out the pleats (I used 3 gather strings and basically made cartridge pleats) and the smokkr is now wearable. However,  that is only the first piece of the project. The smokkr is going to be the middle layer of a new outfit. I’ve got a nice green linen for the serk and a nice tan wool for a coat. The plan is to make a ridiculous heraldic Norse outfit (mostly because I can) with appliqueed hippocampi on the smokkr and coat. I’ve got the first hippocampus on the smokkr and am working on embroidering it. This is going to take a while.

The other major sewing project that took on in 2019 was of course entering the 9th Italian Renaissance Costume Competition. I already posted about that – if you haven’t, you can look at my detailed dress diary notes (link) and the competition results (link). I didn’t win any of the categories, but I finished my outfit in time and I am darn proud of it. I also did my first ever fancy photoshoot of one of my outfits. Need to do more of those!

Three-for-one Dress Diary: Gowns in the Style of Venice circa 1500

I still haven’t caught up on writing dress diaries for everything I sewed last year. I keep forgetting just how much sewing I did! A major portion of that was working on improving my Venetian wardrobe.

A good friend of mine who is a workout and sewing buddy got married last April. She decided to have an in-garb wedding with a variety of times and places represented to represent her and her husband’s interests within the SCA. There were Italian Renaissance outfits, Viking-era Norse outfits, Japanese outfits. I was both in the wedding party and a major contributor to planning and sewing of outfits for the non-sewers in the group. I pleated SO MANY THINGS in the lead-up to the wedding. Somehow I became the pleater-in-chief.

The bride’s own dress was very much in the Florentine ~1480s style that my current outfit I am working on for IRCC is based on. For my bridesmaid dress I decided to revisit my circa 1500 Venetian outfit. I had not made anything in that style since the 12th Night Gown in 2015 and had learned a lot about patterning, fitting and draping self-supporting bodices since then. I felt that I could create something even better fitted than the previous gown. I also felt that I really needed an outfit in proper Venetian colors of red and gold. My own heraldry is blue and silver and I love those colors, but really reds and golds and blacks are so much more prominent in Venetian art. I needed at least one outfit in the correct color scheme. (The bride’s colors for the wedding were autumn colors – reds and oranges, and the groom’s were greens, so there was a large variety to work with as well.)

the original plan for the outfit

This is the outfit teased in this post. In addition to that outfit, I also sewed a dress in light rose pink based on the same pattern. I’m not a pink girl normally, but I was helping to run the Flamingo Ball at Pennsic last year and felt that a new ball gown to fit the theme would be appropriate. I made both gowns from saris bought from Miriam’s fiber store the previous year for the purpose. I also ordered some gold silk from Dharma for the vestito (sleeveless overdress) I had intended to make to match both gowns. Finally, I sewed a third, very last-minute, dress in the same pattern out of a teal and white cotton print I found at JoAnn’s on clearance and couldn’t resist.

I worked with my sewing partner-in-crime, Lady Valla-Ragna in Spakka, to update the pattern first. We started from my bodice pattern from 2015. We cut a new draft of that and pinned it on me and made adjustments. And made more adjustments. I lost track of how many rounds of adjusting and recutting and testing new ideas we did before we were satisfied with the pattern. One of the things that we ended up doing that I’m not sure is historical is adding side darts. I simply could not get the fabric to not wrinkle on the side of my bust without them, no matter what we tried. There are two different variants on the bodice pattern, one with a higher neckline than the other. I didn’t want to show cleavage for the bridesmaid dress so the red has the higher neckline and the teal and pink are the lower.

cutting process

As I usually do with Italian gamurre the bodices of both gowns were lined with linen in similar colors to the silk and interlined with woven interfacing. The sleeves were lined but not interlined. The red silk was very pleasant to work with being a sturdier weave, actually a shot silk with red threads one way and black the other. The pink, which I picked mostly for color scheme, was very light weight and a looser weave. This made it rather a pain to work on.

Due to the differences in the fabrics I used two different construction methods in sewing the gowns. The pink being so much more difficult to work with, I used the sew, clip and flip method. I stitched the interlining to the lining fabric, then sewed that to fashion fabric and flipped to right side out. I top-stitched the edges. I then gathered the skirt and sewed that in to the waist. I find that very light fabrics gather more comfortably than they pleat. (You may notice in the pictures above that my pattern pieces are not symmetrical. Neither am I!)

The burgundy I used a slightly different method as you can see. This involve turning down the edges of the silk over the lining and hand-stitching it down. I also pleated the skirt to a tape first, then sewed it in to the bodice.

Sleeves! Sleeves have been my nemesis for a while now. The one thing I do love about Italian Renaissance clothing is that I don’t actually have to care if the armscye and the sleeve head are the same distance around since they only attach at the top. We spent a good amount of time on draping a new sleeve pattern for this project. We started with getting a very tight-fitted sleeve pattern, and then worked on drawing the openings for the sleeve style that would show multiple poufs of camisa underneath for the burgundy gown. I decided to go for a different style on the pink, straight-edged sleeves with ribbons across. Both sleeve designs were inspired by the famous Carpaccio painting of two Venetian ladies on a balcony. The green and gold outfit her sleeves appear to be more cut with curves, like my red gown. The red outfit is what I based the sleeves on my pink gown off of.

Vittore Carpaccio circa 1490

Although I did start drafting the pattern for the gold silk vestito to wear over both outfits, I still haven’t sewn it. My work on my dress for the wedding got delayed by my needing surprise hand surgery last March so I was rushing to get my gamurra finished. I used my existing black velvet vestito to complete the outfit for my friend’s wedding. I wore the pink gown on it’s own for the Flamingo Ball because I didn’t want a third layer running a ball at Pennsic anyway.

I also sewed a new camisa to wear with the new gowns with a wide neckline fitted to this particular bodice pattern. I gathered it into a band made from the camisa fabric that I measured to fit the neckline.

Finally, the surprise gown. I was at JoAnn’s buying the linen for the camisa and found this fabric on clearance. There was very little of it there, less than two yards, but the pattern was so very Italian Renaissance! and in some of my favorite colors! I bought it and determined to try and make a dress. I would make sleeves out of another teal fabric I had so I just needed enough for a bodice and skirt. This I did the laziest/quickest way possible for every step. Bias tape finishing the bodice! Use selvedges!

In the end, in order to make a skirt I had to do some interesting piecing to make a long enough back piece. I also added the guard of the same teal for the sleeves to make it a bit longer since I got it all cut out and discovered a miscalculation. It’s also a bit tighter than I usually like skirts on these gowns to be. (My rule of thumb is minimum 3x my waist measurement.) However, I did get a dress out of it. I haven’t sewn up the sleeves yet, I just wore it without sleeves as an informal day dress at Pennsic so far.

Reflections

I am very pleased with all three gamurre that I made from this pattern. The pink one that I made for the Flamingo ball I think actually best captures the silhouette of the Venetian style, making my shoulders look long and droopy in a way they never normally do. The higher neckline on the red gown lessens that effect, although it still looks right to me. The cotton surprise gown was a great last-minute addition to my washable Pennsic wardrobe.

I didn’t achieve everything I wanted and I still have work to do on each dress. I had intended to trim the neckline of the red gown with gold ribbon which I need to go back and do, as well as sew that gold vestito to wear with it. The black velvet one worked, but it is heavy and warm and less than ideal for summer wear. I need to actually sew the sleeves for the cotton gown and also fix some unraveling issues at the hem that showed up when I washed it after Pennsic. I also need to actually sew the eyelet holes for lacing on the Flamingo gown, I was just sewn into it for Pennsic as I was working on it right up to the night of the ball. (Mostly the gathering and sewing on of the skirt, that silk was such an enormous pain to work with.)

Overall, this project brought me a lot closer to having the correct clothes for my persona. I also made a lot of progress with drafting patterns so that I can easily make more gowns in this style.

Entering IRCC

This year I decided to enter the Italian Renaissance Costuming Challenge hosted by the Realm of Venus site. In this challenge, sewers create an entire outfit (three layers and accessories) appropriate to Renaissance Italy in 4 months. Extensive handwork such as embroidery is allowed to be started early, but otherwise all cutting and sewing is to be done from April 1st to July 31st. I thought about entering it last year, but I needed my outfit that I was making for my friend’s wedding to be completed in April, so that didn’t really work with the timeline of the competition. I don’t really expect to win in any of the categories, but I like having the structure and deadlines to keep me working on this project.

Portrait of Giovanna Tornabuoni by Domenico Ghirlandaio, ca. 1490

The outfit I am working on is a 1480s-90s northern Italian style outfit, loosely inspired by the artwork of Ghirlandaio and Botticelli but not referencing a specific painting. I think of this particular style as more associated with Florence but it shows up elsewhere as well. I will be making a camisa (shift), gamurra (gown), and giornea (sleeveless overgown). On the portrait above, the camisa is the white layer peaking out in places. The gamurra is the red/black layer. My sleeves will not be quite like those in this portrait as I am opting for a slightly simpler style, although I plan to use the diagonal trim decorating idea. The giornea is the gold brocade layer. For my accessories I will be making jewelry, and if I have time possibly a hat, pocket or belt.

My fabric

Most of the materials for this outfit were bought 2-3 years ago and then left behind in favor of some other projects. My goal was to make an outfit in this style in my heraldic colors of blue and silver. They are not the most historically accurate in terms of fiber but are what I could afford and find at the time that worked in terms of look and pattern. The aqua/jade linen in the top middle is the fabric for the gamurra, it is woven with blue threads one way and white the other, like a shot silk. The plain jade linen below it will be the lining of the bodice and sleeves of the gamurra.

There are two white linens pictured. The larger volume is for the camisa and the smaller is a piece of Irish linen that is intended for the cap if I get to it. The off-white fabric is cotton broadcloth for interlining the bodice of the gamurra. The silvery cotton damask fabric is for the giornea.

The competition officially started April 1, although we were able to plan and buy materials before that. Each month we send in updates on what we have accomplished. You can go to my page in the competition to read my progress reports as they come in.

Blue Silk Cioppa (and new sleeves!)

Atlantian 12th Night in 2018 was themed around the “Palio di Atlantia” and was generally Renaissance Italy themed. I took this as an opportunity to revisit some of my favorite Italian garments and upgrade them a bit.

Me in the blue linen gamurra with matching navy sunglasses.

Remember this dress? Remember how I hated the sleeves so very much? I decided to make new sleeves as well as an overgarment to go with this. Since I decided that this gamurra looks much more 1480s Florentine than 1500s Venetian, I took my inspiration for the overgarment from appropriate images, in particular Domenico Ghirlandaio’s fresco of the Birth of Mary.

Birth of Mary by Domenico Ghirlandaio, fresco in the Tornabuoni Chapel in Florence

Notice in the image that most of the women are wearing at least three layers – shift (camicia), dress (gamurra), and overdress (cioppa) – some are also wearing a mantello or drape as well. I decided to make a cioppa based on the woman in the middle left, with the green gamurra and the gold-trimmed red cioppa. I wasn’t trying to imitate the colors, just the cut and style, including the gold trim.

There were two main styles of overdress in Florence in the 1480s. The cioppa, seen on most of the women in that fresco had sewn together side and front seams and sleeves. Some had a bodice with a sewn-in skirt, others were all of a piece, similar to the pellando (houpellande) from earlier in the century. The other overdress was the giornea. These were sleeveless, with no side seams and often open fronts as well. There were both men’s and women’s versions of both garments. The giornea was generally considered more appropriate for spring and summer than the cioppa.

I decided to make an unlined cioppa out of sari silk knowing that the event would be indoors in a hotel with the heat no doubt turned up. A fully lined cioppa would have left me too warm to dance, and we can’t have that. I cut off the trim from the sari and then resewed it on at neckline and hem. The trim on the garment in the fresco was probably actually goldwork embroidery.

Cutting in progress…

The pattern was adapted from my existing pattern for a mid-1400s pellando. This turned out to be a mistake, as the wool I had sewn that pellando out of stretches a lot more than silk and the front center seam of this cioppa lays a bit oddly. In future I will probably cut an angled front center seam for the cioppa. I may also need to widen it just under the arm as well.

Construction was mostly simple, sewing the long straight seams of the body together and sewing the sleeves. The sleeves are only attached at the top of the shoulder. The most complicated part was sewing the trim down, since I was taking a straight woven item and forcing it around the curve of the hem and the curve of the neckline. I had to do some interesting miters and darts to make it work.

New sleeves with hand-sewn finishing.

The new sleeves for the gamurra I made out of the palu of the sari, and I did line those with linen as they needed some body. Very little of the work on that was done by machine, as I ended up completely hand finishing them and doing hand-sewn eyelets so that they would look right to me.

Sewing eyelets in the sleeves.

The pattern for the sleeves I took from an existing sleeve pattern. I pinned the muslin on and had a friend draw a circle around my elbow so that I could figure out how to place the cut out for the elbow poof.

No cioppa! I never wear the old sleeves anymore.

All in all this project was a success. There are some bits of fitting that I would do different next time, but I like the garments and they are pretty comfortable to wear. Plus they look great!

Photo taken for the Atlantian Garb Runway challenge that I entered at the event.

Venetian gown from 1500 for Atlantian 12th Night 2015

I did not write up a dress diary at the time I was working on this project, but I did take some process photos at the time, planning to write one. I almost never remember to take process photos! So excite!

The Concept

Atlantian Twelfth Night that year was themed around Venice in 1500. I got pretty excited and ended up teaching  some people in my local Barony about it and a bunch of us made appropriate garb. We were very pretty! I had done some more research since the blue and teal gamurre on what differentiated Venetian fashion from Florentine since then, so this was my next big attempt at the “make my garb actually match my persona” idea. I continue to use Realm of Venus for art inspiration – in this case this page in particular. I focused in on the ladies in Gentile Bellini’s Miracle of the Cross at the Bridge of S. Lorenzo.

I came up with two dress ideas, one for a linen gamurra as a test run in pale green, and one for 12th night itself in silk with a velvet vestito (overgown).

Patterning

In December 2014, I worked up a new bodice pattern by cutting a copy of the old one from two linen gamurre and modifying it to be self-supporting and with the wide v neckline. I then cut the bodice for the pale green linen test gown and put it together quickly by machine-sewing, flipping, ironing and top-stitching. I interlined it with a woven modern interfacing for additional stiffness. There are some textual sources that mention interlining in bodices of the period – it seems that wool felt and linen “cardboard” (stiffened with glue) were both used. I put the sleeves together in the same way. I gathered and sewed on the skirt by hand.

I then took this rough draft of a dress up to Pennsylvania when visiting my parents for Christmas and enlisted mom to help make it fit right. It was too lose and not as supportive as I wanted. She took in the side seams and changed their angle as well, and recommended I raise the bottom of the bodice. I copied these changes to the pattern and took it home to cut the final gown. For the pattern of the vestito I used the back of the gamurra bodice, and altered the front to deepen the neckline. I added a very small amount of ease to the side.

Cut and construction

The silk fabric for the gown was a sari someone had gifted me years before, saying that I would find something to sew with it. I lined the bodice in black linen as well as using the same interfacing as I had for the pale green gown. For the vestito, I had polyester velvet (looks more like silk than cotton) and a polyester brocade lining fabric. I did not have money at the time to buy fabric for this project and I was looking for something in the right color scheme (red/gold/black) while my stash was full mostly of shades of blue and green. The velvet and brocade were a gift from my mother.

For the final gown I wanted to use a more period construction than the machine sew-and-flip. Note that the lining and interfacing pieces are cut with no seam allowance in certain spots. After sewing the back center seam, the lining and interfacing were stitched together for reinforcement, and then the fashion fabric was turned over to the inside and sewn down. This particular silk was stiff, so rather than a double turn, I used a blanket stitch over the raw edge to sew it down, planning to tack twill tape over it if fraying became a concern.

The skirt was one long rectangle which I sewed up the side, leaving a slit by where they side lacing would be. I cut a slit in the opposite side and finished the edge. I then pleated it onto the bodice and sewed it down by hand. Here you can see the biggest mistake – I did not line the skirt. I had black linen underskirt I wore with it. (I actually  have this dress taken back apart with a lining pinned to the skirt, waiting to be sewn on. I spent the entirety of that event terrified I would kick a hole through my skirt.)

The sleeves I did up at least partially machine sewing and flipping before sewing on the trim and ties. Unlike the test green gown, I did not use interfacing on these sleeves. I hadn’t liked how stiff it made them.

Here, I stop having process photos as time before the event got more rushed. The vestito was cut and sewn next. The bodice of the vestito was constructed the same as that for the gamurra. The skirt was made of 3 straight panels of the velvet, although I had less of the lining fabric so only lined the two panels towards the front. Pleating the lined velvet was a pain, I ended up sewing down the pleats to themselves and then to the bodice.

The last step was sewing on lacing rings for the side-lacing of the gamurra, which I did a lot of on the car ride down to the event. I did not do lacing holes mostly because I was unsure of being able to do them with the odd texture of the silk.

Results

This was how it looked on the day of the event. I did not get a new camicia sewn in time for the event, so the one I wore had the wrong neckline for the gown.

Reflections

The vestito was too heavy and my shoulders hurt by the end of the event. I also already mentioned the concern about the gamurra skirt. I ended up remaking the vestito skirt by taking out the center back panel. I wore it again for another event over my teal gamurra. Other than those issues, the dress came out well. I did eventually finish the camicia I had cut for this event although I haven’t worn it with this outfit as I still haven’t finished remaking the gamurra skirt. I learned a lot from this project, that’s for sure.

Also a year later I finished fixing the green gamurra, sewed on gold ribbon as trim, sewed some lacing holes in (although a friend helped with that) and wore it to the SCA 50 year event. I really like how it turned out.

Some Gamurre for Pennsic (Dress Diary from 2013)

Last year I posted about my intention to post all these dress diaries. I even wrote most of the up at the time. What held me up was figuring out how to get photos into them. No more! I have figured it out and will be posting these dress diaries every couple of weeks until I’m caught up.
My description at the time of what was going on in my SCA life at the time:
Having taken something of a break from the SCA from about 2008-2011, I have been working on doing some serious revamping of my wardrobe lately. When I got active again, my garb collection was pretty sad, full of really old garb made for Pennsic (ie: in a hurry) while I was in high school, and a few newer, better-fitting pieces I’d made after graduating college. My persona has always been something of a split personality – because my parents are in the SCA, I have a certain amount of loyalty to the idea of being their daughter, however, mom’s persona is 1470-1540 northern Italian (she tends to model herself after the D’Este sisters) and dad’s a 9th-10th century Danish nobleman. My own preference is for late quattrocento Venice.  So last year, for Pennsic, I decided it was time to start dressing like it!

The Concept

 I had decided to focus on the 1480s-90s in Venice for my first foray into more persona-appropriate garb. Finding resources on what was worn specifically in Venice versus in northern Italy in general or Florence was  somewhat difficult. I relied heavily on the images collected at the Realm of Venus. I did end up wandering from just the Venetian images and also drawing some inspiration from Ghirlandaio’s Florentine frescoes.
I’m primarily writing about the blue linen one today (the middle concept sketch). The teal one isn’t finished and I haven’t even cut the brown one. 🙂  (The teal gown is finished now and I ended up making a Norse dress out of the brown herringbone linen instead.)

Patterning

Like my Greenland Gown step 1 was to take my measurements and an existing pattern to cut a muslin draft, then baste it and pin to adjust. There are no extant Italian gowns of this era that I am aware of, and the images don’t really make the construction clear, other than the fact that there are side and/or front lacings and no obvious seams that would indicate complicated piecing to shape over the bust. Based on this, I went with 4 pieces – 2 front/sides and 2 back/sides. I don’t know that you even have to have a back center seam, but I find that ANY garment in a woven fabric without a back center seam simply does not fit well on me. I have to add it to modern dresses pretty often.
In pinning to fit we ended up with curved front and back center seams and straight side seams. I have since seen other people describe their patterning process for these dresses as based on the gothic fitted gown style, where you start with the back and side seams pinned straight and then pin up the front seam to be very tight and supportive of the bust.  I may try this method at some point, although I’m not convinced that these gowns fit quite like that. (I have some different ideas on how to shape and pattern this now than in 2013, heh.)
For the camicia, I took the neckline of my gamurra pattern and made a neck piece which I gathered the full neckline into.
The bodice was lined and machine sewn then flipped and top-stitched. The skit was gathered to the waist. In order to use less fabric but still get a fairly full skirt at the hem I used a suggestion I found online in someone’s dress diary (don’t remember who) and cut the skirt panels as trapezoids (you can see in the cutting layout sketch above). I found Venetian glass lacing rings at Pennsic and sewed them on with buttonhole stitch. The lacing is “ladder” style which you see in some portraits and  it is a piece of lucet cord that I made.
(2019 me!) I hate these sleeves. I made them without lining them and the trim started falling apart. They don’t fit how I wanted. The teal ones are a little better but also should have been lined. They were my first attempt at interesting sleeves.

The finished Gowns

Although both turned out fairly well, I end up wearing the blue a lot more often than the teal. It’s just very striking with the deep blue against the white camicia, and off course, sets off my blue eyes. I never did end up doing the planned trim on the teal, it’s ended up being more of a camp dress than something I want fancy trim on. Both fit fairly well but are not self-supporting, so I wear modern undergarments with them. Actually, I was wearing an early 18th century pair of stays with them for a bit (same silhouette) but the stays no longer fit.

Reflections from the future

(2019 me!) The blue gamurra came out much closer to plan than the teal, and I still wear it very often. The teal mostly gets brought out at Pennsic or when I particularly want that color for something. I honestly failed at the “make it look particularly Venetian” part of the plan – the blue gamurra looks very 1480s Florentine to me now, especially with the natural waist placement and center front lacing. I don’t actually mind that, but it definitely was not the goal. (I will be posting a recent project to make new sleeves and a Cioppa overgown to go with it soon.)

If I were making it now, I would actually  have side-lacing in addition to the decorative front-lacing. I have seen some evidence of this in paintings and on statues since and it makes a lot of practical sense. I would also be altering the pattern to make it self-supporting, and I would not cut the skirt panels as trapezoids. More fullness! All the skirt!

Dress Diaries

Introducing the Diarii di Abbigliamento di Signora Helena Hrolfsdottir…aka my dress diaries. I have something of a backlog of half-finished dress diaries going back to (*gasp*) 2013, as well as several more current projects I’d like to do a better job of tracking. It has been five years of me saying that I would write this stuff up, but this year it’s really happening. My hope is to post once a week, whether an old dress diary or an update on current projects. That may not be a sustainable schedule long-term, but I feel like I have enough material to make it last for a few months.

I will be marking the year of the older projects in the title, but not back-dating the posts. I have learned A LOT in the last five years of sewing, that’s for sure. Hopefully this project will help me see just how far I’ve come. I also want to work on some formal write ups of all the research I’ve been doing on late 15th century Italian women’s clothing, but I need to dig a lot of my sources back out for that.

In the mean time, a teaser for my current project: